Table of Contents
I have already shared two guides for installation of Google Play Services and Google Play Store earlier. Those guides are still valid and working for EMUI 10 and lower versions successfully without Google Play Services and Play Protect Errors. The problem started after 18th June when many users getting error while logging in to Google account during GMS installation. The error was can’t communicate with Google Servers. So if you are also getting this error then you can try the fixes given in this tutorial. This is working as of 1st July and hope so will continue to work.
Googlefier-Install Google Mobile Services on Huawei easily
I have tried this on Huawei Nova 7i but you can use this method on Huawei Mate 30 Pro, Huawei P40, Huawei P40 Pro, Huawei P40 Lite, Huawei Y8s and other recent Huawei and Honor devices.

TIP: For everything to go as planned we suggest that you read this tutorial until the end and not miss a single step.
Requirements
To be able to perform the steps in this tutorial for installing Google services on your Huawei Nova 7i/ P40 Pro / Mate 30 Pro / Mate Xs / P40 Lite you need to ensure that you have:
- Backup performed (to restore your data when the process is finished) Install on a new phone if possible.
- USB stick and OTG adapter. Not required for file 2
- Internet Connection
Recommended: Top 9 Secure Google Play Store Alternatives
Compatible Models
We have successfully tested this method on the following models:
- Huawei P40 Lite
- Huawei Mate 30 Pro
- Huawei P40 Pro
- Huawei Mate Xs
- Huawei Nova 7i (not for build 228)
- Must work on all Huawei devices without GMS
Other Method: How To Install Google Services/Play Store On Huawei/Honor
[How To]Install Google Services/Play Store(GMS) On Huawei/Honor Phones
Video
In video, I used File 2.

Note: As for the latest builds LZPlay app is not working and sign in error is also there. This method may not work for you but you can try once. So if you can’t get Play Store there are some alternatives to Google apps and some Google Apps work without Play services as well. I have mentioned all this in a post you can read here.
Step By Step Guide To Install Google Play Store & Services
- Download the ZIP file from the button below:
- Transfer this file to the USB drive. Not needed for file 2. You can install without USB.
- Connect the USB to the smartphone.
- Extract the Google installation file in the root directory of USB.
- You will have a folder “GMS and Backup“.
- In this folder, you will have a backup APK and a folder “Huawei“
- Now move the Huawei folder to root directory. (root directory means without any folder)
- Now, this step is different from the previous guide.
- Now go to settings > apps > show system processes by clicking 3 dots in the upper right corner.
- Search backup and force stop and uninstall it.
- Now go the folder GMS and backup and install “Huawei backup APK“
- Now go to settings> backup and restore
- Go to the “Backup and Restore” option
- Choose Restore Backup from external storage (the USB connected to the smartphone).

- Here you will see “7 March” backup.
- Possible error: No backup file visible in the backup and restore. Solution: Before moving “Huawei” folder from installation folder to root directory, open back up and restore from settings.
- Select 7 March 2020 backup for restore.
- The password for the restoration is “firlando234”.It will be shown there also as a hint.
- Now restore the backup.
NOTE: You will get an error while signing in to Google account. So before the next step change the date of the phone to last month and change it to the current date before sign in. In this way, you will not get the error and there will be no need to uninstall Google Account Manager.
- Go to the home screen and close all background apps.
- Now look for LZPlay app(G icon) in the apps drawer or home screen and open it.
![]()
- Give all the permissions
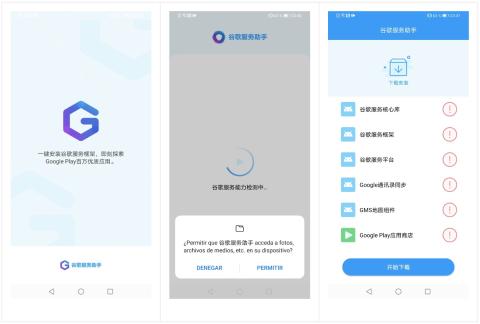
- It will show a list of apps in Chinese.
- Do not press any button right now.
| UPDATE: In case LZPLAY does not run correctly and not show the list of apps with a blue button in the bottom, uninstall LZPLAY and uninstall “Backup” app. Now reboot and install APK from the fix file and reset the backup. If everything works fine to proceed to the next step. |
- Open PLAY> Return to the home screen > Close all background applications> Open the LZPLAY application again> Touch the blue button at the bottom.
- Minimize the LZ Play app
- Now go to Files> External USB> Google Installation folder> Install first 6 APKs, they are numbered. Make sure to check 2 boxes when installing the first app.
- Do not install the other three.
- Don’t open any app.
- Close all applications and clear background apps also.
NOW THIS IS THE TIME TO ADD GOOGLE ACCOUNTS IF YOU HAVE MORE THAN ONE ADD THEM ALL. If you need to add an account later you need to freeze google framework app.
- Go to SETTINGS > ACCOUNTS AND USERS and add Google account. But this time it will say can’t communicate to Google Servers. The problem is due to old account manager app. When you press existing account you will see 3 dots in the upper right corner. touch them and choose browser sign in. It will still say that “Can’t Communicate with google servers”. But you need to ignore that. Try again until it’s stuck on signing in and then proceed to next step.
- Now proceed to the next step. You will start getting error.
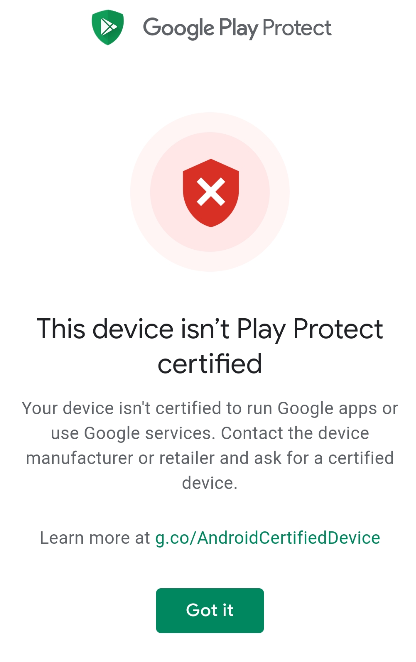
(Now the Play Services errors will start to appear. Everything is fine. It’s already resolved! The Play Store should start updating, it may not be immediate, wait for 3 to 4 minutes for the updates to finish, otherwise, you will have to repeat everything! The updated version can confirm that you have already updated by opening the Play Store and in Settings to see if they have the latest version)
- Now go to the Files> Google Installation folder > install APK number 7.
- Just open play store and see if the account is there. Now go to apps > Google Account manager > force stop and uninstall. We will install it later. after we remove the error successfully.
- Return to the home screen and close all apps.
- Open the Play Store and install the Device ID app.
- Open Device ID and give permissions.
- You should have Google Service Framework number.
- Close all applications.
Resolving Google Play Services Error
- Confirm in Device ID that we have the Google Service Framework number.
- Go to Settings > Applications > show system processes > Google Services Framework and clear cache and clear data. You should do it 3-4 times. This is necessary to lose the GSF number.
- Return to the home screen.
- Close all applications.
- Confirm in Device ID that the Google Service Framework number has disappeared.
( Possible problem: The number has not disappeared, in this case, clear the Framework cache and data again, open the Device ID again, repeat until the Device ID number disappears)
- Now open settings > apps > open Google Play Services > Clear Cache and uninstall.
- Close all apps
- Now go to files and install APK number 8 now.
- Go to the home screen and close all apps
- Now open play store it will give an error. Retry until it loads and apps are opening.
- Now close play store and clear background apps.
- Open Device id. Now GSF number should reappear.
- Now got to settings> apps> show system processes > google services framework and clear cache and clear data.
- Return to home and close all apps.
- Open device id and GSF will be gone.
- Open play store and open an app. It will give an error. Try 4-5 times and if it doesn’t work restart your phone.
- After restart open play store again.
- Check if it works fine. Try 4-5 times if it works fine by closing it and opening it again.
- If it doesn’t work, restart your phone again.
- Now open play store it should work.
(If after several attempts the GSF number does not appear again and the Play Store continues to give an error. Do the following: Clear Google Framework cache and data + Clear Play Store cache )
- Open Device ID application and confirm that we have the Google Service Framework number back.
- Now go to settings > apps > show system processes > Google Play Services and uninstall.
- Now Go back to files and install APK number 9.
- Done.
- Now you will not get the error.
- The last step, remember we uninstalled Google Account Manager? You can reinstall it now or later as you wish.
If you still get an error then you can repeat Error Resolving steps as long as the error is there. I haven’t typed anything wrong and not repeated anything. These are the steps are actually needs to be repeated again and again. So keep calm and do not change the sequence of a single step or you will not get the error fixed.
I have used this method myself, it’s not a copy-paste from the web. I have restarted phone several times just to ensure that error is definitely gone. So this is the working method and will work for you also.
You should install the system updates, if any, before installing. This method is working as off now June 1st, 2020. I have used this method and successfully installed google apps.
This method was provided by Firlando234 and all credits to him.


